Sunday, July 28, 2013

Sleeping on the job


Wow, where does the time go?!  I cannot believe it's almost the end of July and I haven't posted anything since last Christmas.  Sorry about that.  Sometimes time and I do not see eye to eye.  To get myself back into the groove of posting, I thought I would share some of the sets that I have created recently.

I receive a lot of requests for bedroom sets to showcase sheets, blankets, computers, and home decor items.
Dorm Room

Loft


I could easily recreate a bedroom over and over again, but I try to make each one look different.  I am usually given a direction to go -- modern, traditional, cottage, teen, masculine, etc.  But the rest is up to me.  I like to create a story for the room, such as who lives there, where the doors or hallways lead, etc.  It helps me create a more realistic look, in my opinion.


Two things that I change in each room are the night tables and what's at the foot of the bed.  You do not always need to get the matching tables when you buy a dresser. I've used all kinds of tables, trunks, stools, and chairs as end tables.  I usually stack books on the seat of a chair, but this time I went for a softer approach.

Cottage

Traditional 
Country

Farmhouse/Country

Girl's Room


I thought this color combination was interesting --grey, green, and hints of orange. I used an outdoor urn with round frosted glass top from another table as the nightstand.  It turned out to be the perfect height and looks great.


The combination of blue, yellow, and tan create a soft and serene bedroom that's comfortable for everyone.


Collections always make a room look more personal and lived in. Clocks on the mantle or small chairs hanging on the wall; a big impact with only "one" item.  The round green night table doubles as a place to have morning coffee or write a thank you note.


Modern loft/hotel


Teenage girl


Cabin/Hunting Lodge
I really like how the headboard frames the lamp. Placing a simple tray on the ottoman turns it into a night stand.


Traditional


One of the best ways to make your room look pulled together and professional is to spread out the accent color(s).  In this neutral room I used blue as the accent.  The blanket on the bed, the chairs, lamp, art, and vases spread the color around the room and make it feel complete.  Even though the shades are slightly different, the room reads tan and blue and calm. 


Sunday, December 23, 2012

Christmas time!


Decorating for Christmas can be a daunting task, especially for those of us who have been doing it since July.  Working for a  retail based company, Christmas seems to happen all year.  So by the time December rolls around, I have to gather all my Christmas energy and decorate my own home.  I usually do a color theme for the tree and then that spills over onto the mantle, coffee table, and other places.  2012 brings a red and white theme, with some woodsy hints.  We start with a Frasier Fir.  We like the more open feeling and sturdier branches.  This year's tree is quite narrow, which works out well for the corner we place it in.   A Christmas tree's magic lies in the lights. I have not switched over to LEDs and I am resisting.  I love the look of the small incandescents.  What you cannot see from the picture is the strand of large bulb lights running up the trunk.  I have randomly changed out about half of the static bulbs for blinking bulbs.  This creates a fun magical twinkling effect without being obnoxious. Then, I wrap the tree with strands of clear lights, and strands of clear and red lights.

The ornaments have been collected over years.  Most are round glass, but there are lots of other shapes and materials. Like I said, I only used red, white, clear, and combinations of the three.  To add the nature element I added some red birds, natural dogwood branches, and pine cones of various sizes and species.  The tree topper is a star made of white pine pine cones.  I wired each one to the top of the tree in a star burst arrangement.


 The mantle is an extension of the tree theme.  I started with white, natural, and iced branches.  Next came the pine cones.  There are white, sugar, Austrian, and other varieties.  I did one large grouping in the center, and then a grouping under each sconce.  I very rarely wire anything together.  I like the challenge of balancing and arranging.  After the cones are placed I start adding the greens.  I like to use a number of different kinds of greens.  Frasier, arborvitae, and Douglas fir were used this year. I often use white pine as well because I love the long needles.  And finally, the small red ornaments add the color and contrast. 

So what's the lesson here -- layering.  Christmas decorating is all about layering and mixing.  In the tree I layer the lights; large lights as close to the trunk and smaller ones towards the outside.  I put ornaments inside the tree as well as on the tips.  When you look at the tree you see white ornaments with red ornaments behind them.  The greens and branches are layered as background to the pine cones on the mantle.  I mix varieties of greens, sizes and colors of ornaments, and shiny and matte finishes.  All of this mixing and layering creates a sophisticated and festive look for the holidays. 

And then there are the outside decorations.  I save the big wow factor for Halloween.  For Christmas I try to be a little more subtle and classic.  The urns outside reflect what is happening on the inside.  I started with a small three foot Douglas fir tree that I purchased at the home improvement garden center.  I've seen these trees at grocery stores as well.  I kept part of the base that came with the tree and buried in the soil to help keep the tree upright.  I then added greens.  Like the mantle, there are all types of greens to add texture and subtle color.  There are also holly branches to add some red. To add some more height to the arrangement, I added white painted branches and what I believe are red osier dogwood branches.  I picked up those items at the local nursery.  And it wouldn't be Christmas without lights.  There are two strands of clear white lights woven in the branches and greens.  This is really the first year I've done Christmas arrangements for the outside, and I think they turned out well.

The arrangement for the porch is done in the same manner, but on a smaller scale.  A friend told us a great phrase to help in arranging planters -- You start with a filler, add a thriller, then the spiller. And that philosophy is great.  The greens are the filler.  The ornaments and tall branches are the thriller, and the low arborvitae and pine cones that hang over the edge of the urn are the spiller. 

So as you make your way to friends and family this year, I hope you take note of all the beautiful ways that they have decorated.  It's just one of the many ways we can express the joy of the season.  

Have a Merry Christmas everyone!

Friday, November 23, 2012

More Fall

As promised, here are more photos of the home my partner, nkohlinteriors, decorated for Thanksgiving.  He had a florist do some of the arrangements, but he did all the other, non floral arrangements.  I hope you enjoy and can get some ideas for next Thanksgiving.

Wreaths on the front door.
 Here is the front porch and the containers that I showed in my last post.  All but two pumpkins are real.  Nature is full of beautiful colors.
Buffet table with gourds.
The inside staircase.


 The dining table is set for 14.  There are three of the flower centerpieces with the single candle and two of the other arrangement. The table cloths are a deep violet mixed with gold napkins. 

 I love this grouping.  It's in the kitchen and is therefore slightly less formal.  The glass cylinders have a mix of cranberries and nuts.  The small container is in a simple terra cotta pot.

The florist was asked to use fall vegetables and fruits in the arrangements.  There are pomegranates and artichokes mixed in with the magnolia leaves, pheasant feathers and other greens.

Monday, November 19, 2012

It's still Fall


Despite what the commercials and retailers are showing you, it's still Autumn. And with Thanksgiving this week, I thought I would share a few more fall ideas.  My partner, nkohlinteriors.com, is decorating a client's home for Thanksgiving, and I've been helping him with some of the details and ideas.  He is putting new planters on the front porch and surrounding them with pumpkins and gourds.  We thought that it would be rather easy to find mums, pumpkins, etc, but it turned out to be a little more challenging.  It seems that after Halloween, most retailers, nurseries included, start switching over to Christmas. Poor Thanksgiving.  It's the holiday that Autumn is all about, and yet, it seems to be forgotten.  The good part is that much of the fall decorations were on sale. Mums were the most difficult thing to find, but the grocery store saved the day.  This weekend I planted the containers for him.

 
We used a red spike in the center with two burgundy mums, two purple cabbages (the one container has a spikey kale and cabbage), and a dusty miller. I then filled in the empty spaces with arborvitae.  The colors look sophisticated and festive.  Adding the dusty miller and greens also make these containers great for transitioning into the Christmas season.  Once they are in place on the clients porch surrounded by the pumpkins and squash it will be a very welcoming scene for Thanksgiving.  

I will hopefully be adding more posts this week as the decorations go up and the table is set.  I think it will turn out to be beautiful Thanksgiving for this family.


Monday, October 8, 2012

Halloween Decor


It's October, and that means it's time to put out my Halloween decoration.  Yes, decoration; a single item.  A couple of years ago I wanted to do more than just display a few pumpkins, but I did not want to do the normal yard full of tombstones.  I stood in front of my house and tried to picture what would be dramatic and make an impression on the neighborhood kids.  So I thought of this:


I started with a picture of my house, printed it out, and began figuring out the contact points for the web.  I wanted the kids to be able to walk under it, so that meant it needed to go near the door and go into the yard as opposed to being flat against the house.  Then it was off to the hardware store.  The center point is a 3 inch steel ring.  The web is clothes line, about 600 feet of it, with cable ties, around 250, piercing the horizontal and vertical runs to hold the intersections together. I had to build most of it in place; I'm sure the neighbors were a little puzzled when I started. 


The spider itself is styrofoam from a craft store. I glued layers of them together and cut and sculpted the body of the spider.  He has 4 eyes and fangs also carved out of styrofoam and glued on the head.  I coated the whole thing with Mod Podge to smooth out the surface and to help the paint adhere.  His legs are PVC pipe, 4 feet each.  I used a heat gun to bend them at the joints. There are connector pieces attached to the body so I can remove the legs to make it easier to store.  I put a small tea cup hook at the end of each leg to attach it to the web.  The paint is UV so it glows with a black light.


Besides the black light, I used a green flood light shining on the house.  I changed out the bulbs in the front porch lamp with flicker flame bulbs. And, finally, I added the pumpkins in the upper window.  These are store bought faux pumpkins that I stack together.  I get just as many compliments on the stacked pumpkins as I do the spider.  (This window gets a lit Christmas tree in December, and a lamp the rest of the year.)
I knew the kids in the neighborhood liked our Halloween decoration when a group of teens asked if they could have their picture taken in front of it.  It may not be very scary but it still says "Happy Halloween".

Sunday, September 23, 2012

A Fall Refresh


It's fall, and that means it's time for apples, sweaters, and planting.  Around the middle of September I get the urge to redo the urns and containers around the house.  Don't get me wrong, the summer plantings were very pretty this year, but towards the end of the season some of the plants have gone past their prime.  Petunias start to look a little straggly, impatiens don't look healthy, and even the coleus are getting woody and losing leaves.  Now is the time to purchase mums, kale, cabbage, and pansies.  I like to stick to a color theme for my containers, and this fall I chose purple and crimson.  I found these dark purple pansies, appropriately named Halloween II.  Combined with some crimson pansies, and dark red mums they replace the yellowing impatiens that lined my flower beds.  Pansies are quite hardy and many will continue to flower in the winter.


For our large urn, I replaced the petunias and other annuals with a couple spiky kale and 2 red mums.  I like to choose mums that have not quite burst into bloom yet.  I want the color in the garden to last a as long as possible, so I pick flowers that will bloom in few days or weeks.  I used a few small pumpkins as accents.  The umbrella grass was still going strong and it adds the height to this grouping.

TIP:  When planing your summer containers, plan ahead.  Try to use a few plants that will age nicely into the fall so you are not replacing everything. 


Summer
Fall
For my smaller porch containers, I replaced the coleus and petunia with a small mum and a cabbage (the petunia is in the back of the urn in the summer picture). I kept the begonia since it still looked nice and the blue arrow juncus.  I use both perennials and annuals in my containers, but sometimes perennials do not winter in containers.  If you would like to save a perennial for next year, you should bring them inside or a sheltered area for the winter or replant them to the ground before the frost hits. Add them to your existing flower beds or designate a section for wintering your penennials.  When spring arrives, simply transplant them back the containers.  (I love the texture of the juncus, so I'm hoping it will survive the winter.)

During these crisp autumn days, before the leaves start falling, make a trip to the local roadside stand or nursery and pick up a few fall plantings to refresh those summer containers and flower beds.


Sunday, September 2, 2012

Do you have the time?

Men's fashion does not change as rapidly as women's fashion. Therefore, I think men should invest in classic basic pieces that they can wear regardless of the trends.  For example, every man should own a classic black two button suit.  And to wear with that suit, every man should own a watch.  Yes, I know, your phone tells you the time, but nothing finishes off an outfit like accessories; every woman will tell you that. There are many styles, designs, and prices of watches to fit every personality.  Think of you watch as another way to show people your individuality.

Now if you only have a watch like this Casio, well, you should consider something a little more formal. If you are running a marathon, sport fishing, or painting the house, then a watch with a dozen functions and a digital readout is fine. But remember, your phone does all that too.  You may want to pick something else for the office, like this classic style from Fossil.   There are no set rules for fashion, but guidelines to help you look good.  Here are my guidelines for selecting a watch to help you guys look the best you can.


fossil.com
tourneau.com
 If you are only to going to buy one watch, pick a classic face with a silver case and a leather band.  I think your band should match your belt.  If you have more brown belts, then choose a brown leather band. Black belt, then black band.  To be safe you could always have one of each.  


fossil.com
There are plenty of sporty or casual watches out there. But like I said before, sporty doesn't mean it needs to have a thousand functions.  This blue rubber band watch from fossil is a great example of a casual watch to wear with jeans, or casual Friday at the office.  Of course I don't expect you to have a blue belt, that's why this watch is more casual.  If you do not want to keep buying watches, try buying a few extra bands and change them out depending on the season, occasion, or your mood.  Fossil has a great website where you can pick the face and bands separately to really give you a custom look.


stormwatches.com


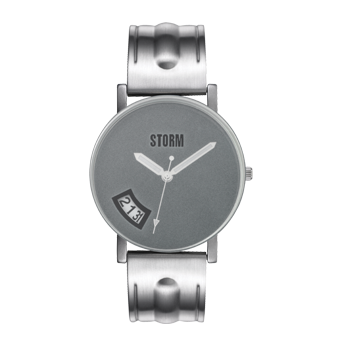
If the traditional watch face is, well, too traditional for you, look at something like this steel band and face watch from Storm.  This watch can add a modern touch to a suit and still be sophisticated.  Pair it with jeans and a vintage graphic tee and you can retain your cool status with  the hipsters. 


stormwatches.com
Fianlly, take a leap of faith with something futuristic.  It might take you a second or two to read, but what a conversation starter.  The black and steel combination of this watch from Storm adds a formal touch to it's super modern feel.


The next time someone asks you what time it is, don't fumble in your pocket for your phone.  Instead show off that timepiece that reveals part of your personality.


Monday, August 20, 2012

Longwood Gardens

If you are looking for an excellent botanical garden to tour and you are in the Philadelphia area, you need to spend a day at Longwood Gardens in Kennett Square, PA.  It is amazing!  A couple of weeks ago we went down to see the current exhibit, Light: Installations by Bruce Munro, and spent several hours walking the grounds.  Botanical gardens, like Longwood, are perfect for getting ideas for your own garden. It's easy to get overwhelmed by the shear size and number of plantings, but remember the numbers can easily be scaled back for your backyard and flowerbeds.  So here's are my tip for visiting a botanical garden: take tons of pictures!  Here are few of my pictures from Longwood Gardens that will give you some planting ideas to inspire your personal gardens.


Chances are you are going to take pictures anyway, but take a few pictures of the tags.  I know that sounds odd, but you'll be thankful you did.  Most professional gardens label the plants they use.  It will be easier to reference a picture then a note written on a napkin ("purple leaves, some sort of vegetable?") You will now know exactly what you are looking for at your local nursery.


Color blocking is not just for fashion, it works well in your garden; plant groups of the same plant close together.  There are not as many different plants surrounding this fountain as you might think.  There are impatiens, coleus, grass, and clematis. The large numbers of the same plant creates a big impact.  The color also helps create the wow factor -- chartreuse, burgundy, and pink.  Coleus are great for mixing with your flowing annuals.  There are so many varieties in all types of colors.  I think there were about 4 varieties of coleus in this fountain garden.  


 Add some contrast.  Besides color contrasting, the mix of hard and soft always makes for a pleasing garden.  Here the fountain urn and stone wall add the hard element.  These elements help make a backdrop to the soft leaves and colors of the impatiens and coleus.  If you can't add a fountain like this to your garden, add a large urn or sculpture or boulder.  Make sure it's large enough so that the low plants have a background and do not hide it. Like this urn, sometimes it looks great empty. But filled with complimentary plants, this would look just as beautiful.


Repetition.  One way the formal nature of this path is achieved is by the repetition and spacing of the urns.  You've seen this before done with trees along a driveway or street.  It creates a sense of importance to the end of the path and you instictively want to walk down the path.  These urns are about 4 or 5 feet high and the agave make a dramatic "top" to the bottle shape of the urn.  Use a smaller urn, or tall shrub and this could be your driveway.


I've mentioned this before, but containers do wonders for landscapes.  This island of containers is the focal point of the paved area.  Here they used silvers and purples to tie all the containers together.  Not every pot has the same number of plants or even types of plants, but they all stay within the color scheme.  This is also a great example of everything I mentioned above.  The color blocking, contrasting, and repetition all make this grouping of containers a single garden.

And finally, height.  Take note that in all the pictures I posted that there is something that draws your eye up.   That's not to say that a garden cannot be beautiful with low plants.  But having layers of tall and low elements add drama and movement.  It could a fountain, an urn, or a tree. So as you visit those gardens, remember to take pictures and start planning for spring!

Monday, August 13, 2012

Flat screen art

One of today's modern technological wonders is the flat screen television.  But it's one the great challenges interior designers face.  How do you make a black rectangle look good?  There are ways to hide them if you do not want to have it out in the open.  Personally, we have ours in an entertainment armoire.  We were limited by the width of the cabinet, but that was fine with us.  There are console units where the TV rises up, and there are ways to hide the screen behind a movable piece of art.  And some people are fine with the TV being front and center on the wall.  So that's what I'd like to talk about, how to make your flat screen TV part of your decor.

In this example, I created a home theater; something that might be done in a finished basement. I faced all the furniture towards the TV, and raised the back chairs up a few steps. The TV was placed on a "built in" cabinet surrounded by red drapes.  We added uplights behind the TV and behind the flanking plants.  This adds some extra drama to the space.  It would be easy to take this up a  notch by adding some gold fringe to the curtains and even making them open and close with a remote control.  And this would look even more dramatic with a larger flat screen or projection screen.

How about adding some bookselves around your TV?  In this example the TV is mounted to the wall surrounded by books and collectibles.  I left plenty of room below the TV to decorate.  The low cabinets could easily turn into extra seating when the TV is not in use, just add some pillows or a cushion. The bookshelves frame the screen and make the wall interesting and pleasing when the TV is not turned on.  This a great solution for a small space where storage and floor space are much needed.


And if all else fails, make your TV art.  I completely surrounded the screen with framed art, empty frames, and shadow boxes.  I used black and white pictures and neutral frames.  The TV becomes part of the art wall even when turned off.  To make it blend even more, create a frame for your TV that coordinates with the frames on the wall.  To take this idea of TV art one step further, Restoration Hardware is just one of the companies that offer television easels.  Artists style easels built for holding flat screen TVs.  Great idea!  So don't settle for a TV stand, make your TV part of your room.
Sunday, July 29, 2012

Porch planters

It was a rainy day in Lambertville, NJ, but that didn't stop us from wondering in and out of the shops. If you have never been there or to New Hope, PA (which is just a quick walk across the bridge), it's filled with quaint boutiques and galleries.  And, if you walk a few blocks off the main street, you can find some beautiful Victorian homes. These are the places where it's easy to find home and garden inspirations.  I noticed this buttery yellow stucco home with black shutters and lots of iron work.  What really drew my attention were the plantings. 


They did not have a lot of planting space in the yard, but they made the most of it.  They alternated two plants against the house and a continuous row of impatiens along the fence. What I really like about this garden is the color scheme and how the plants in the ground relate to the plants in the planter.  All the flowers are white and some of the plants have green and white variegated leaves.  Also notice that the plants are in terracotta pots, which relate back to the stucco finish of the home. The great part about using pots is that the homeowner can easily change out the plants depending on the season, month, or even their mood.


It has the three components of a great container garden -- range of heights, color, texture.  The topiaries lead your eye up, while the ivy and vines bring your eye back down. Most plants look good together, but a good color scheme appears more thought out.  This monochromatic palette of white looks modern and sophisticated.  And, finally, the similar shape of all the leaves gives a soft relaxing feeling.  All of which add to an eye catching planter and a welcoming front porch.

Saturday, July 14, 2012

Outdoor dining

Eating al fresco is one of my favorite things to do in the summer, assuming the humidity is not unbearable.  I know people that use their outdoor dining spaces more than their indoor ones.  Yet, many people don't take the time to make them as inviting or interesting as their indoor ones.  People feel that it's a casual space and they are not going to be out there that long.  But if the company and the weather are good, you could spend hours chatting, playing games, and just enjoying the weather.  If you are going to sit at your dining table or picnic table, you should have something beautiful to look at, not just the ketchup and mustard bottles.  The outdoor table is the perfect place to get creative with your centerpieces. 

A few weeks ago I had to display a set of outdoor dinnerware in various locations. When I need to do more then one lifestyle display, I always try to make them different in style and feeling. I could have easily made up a floral arrangement for each table, but I wanted to be more creative and match the locale we were shooting in.  Our first scenario was a beach house.  Once again, we built this in the studio.  As you can see, I mixed pieces of drift wood, white coral, starfish, and shells down the center of the table.  The neutral colors of the objects mixed with the black and white dishes, add a subtle formality to the casual nature of the beach. What a great way to use what you have collected over the years.  A fun variation would have been a long pile of sand with shells, sand dollars, and little tea lights.  You can really have fun with a beach theme.

Next we went to a local home with a beautiful raised deck overlooking an expansive lawn and garden.  I tried to bring the backyard up to the table. I used a low container and filled it with faux grass.  I then added the croquet stake, wickets, and balls. The mallets and other balls are casually arranged on the table runner. I love this idea of the grass container.  You could easily plant real grass and keep it watered and trimmed.  It becomes the base for your summertime centerpieces. Cut flowers, fruit, or other garden objects could be changed out for each gathering. To make this even more modern, do not add anything to the grass or substitute the grass with small succulents, such as sedums, hens and chicks, or jovibarbas.

Finally, we went creek side and had a picnic. I kept this scenario all American with reds, whites, and blues.  I did a simple arrangement of white gerbera daisies in a red watering can grouped with birdhouses. A rustic box with the flatware and simple condiments become part of the centerpiece grouping.   A small container of fresh flowers from your garden grouped with candles, terra cotta pots, or even clean garden hand tools could also make a fun casual table.  If you just want to just have flowers on your table, try splitting your arrangement into smaller mismatched containers or a grouping of mason jars.


All three of these arrangements were very inexpensive to create.  They were made with found natural objects and things you probably have in your garage or garden shed.  If you don't have many flowers in your garden, purchase some while you're at the grocery store picking up the rest of your meal. Also, notice I kept them all fairly low to the table.  You do not want to be moving from side to side, dodging a tall vase of sunflowers to hold a conversation with the person across from you.  So next time you are enjoying dinner outside, take a few minutes to arrange a centerpiece, you're guests will love it!